Windows has no setting to keep the mouse in one area. The free fix: snap the app into that part of the screen, then let LockSpot lock the cursor to its window (one app free). For any rectangle on an ultrawide, draw a Custom Zone: try Zones free in the app for 2 minutes; keeping it is a one-time upgrade.
Creator Kit makes LockSpot.
Why Windows Can’t Fence the Mouse on Its Own
On an ultrawide, the pointer drifts out of the panel you work in: off the timeline into the preview, off the chart onto the order book. Windows 11 has no setting that stops it. Snap layouts (Win+Z) and PowerToys FancyZones split the screen into areas for windows, but the mouse still crosses every edge freely.
The pointer only stays inside a rectangle when a program asks Windows to clip it, through the documented ClipCursor API. Games do this for their own window; desktop apps almost never do. So limiting the mouse to part of the screen takes a small tool. Here are four, free options first.
| Way | Area the mouse stays in | When it holds | Free / Paid | Best for |
|---|---|---|---|---|
| 1. Snap + LockSpot Auto-Jail | One app’s window, wherever you snap it | While that app is in front | Free (one app) | One app on half of an ultrawide |
| 2. LockSpot Custom ZoneOur pick | Any box you draw on one monitor | Whatever app is in front | 2-min preview free; $3.99 one-time (US price; local prices vary) | Timelines, charts, canvases; several saved zones |
| 3. Lock Cursor Tools | A drawn area (can span monitors), a monitor or part of a window | Until you toggle it off | Free (freeware) | One area across two monitors |
| 4. Dual Monitor Tools | A whole monitor only | Until you toggle it off | Free (open source) | Whole-screen locking plus other multi-monitor tools |
Why the zone is our pick: it is the only option here that fences the pointer into an exact box whatever app has focus, with several saved boxes on one key. It isn’t free to keep, so Way 1 comes first.
Way 1: Snap the App, Then Lock the Cursor to Its Window (Free)
If the area is one app, make the app fill it and lock the pointer to the app. Both steps are free.
- Install LockSpot from the Microsoft Store.
- Check that Settings → System → Multitasking → Snap windows is on.
- Click the app, press Win+Z and pick the part of the layout you want, or press Win+Left / Win+Right for a half.
- With the app still in front, press LockSpot’s Quick Add hotkey, Ctrl+Shift+A. (Or open the Auto-Jail tab and pick the app from the running-apps list.)
- Push the pointer against every edge. It stops at the window border.
The lock follows the window if you move or resize it. Alt-Tab to another app and the pointer is free; switch back and it locks again. This is the same Auto-Jail that fixes a mouse that keeps going to the second monitor while gaming, pointed at a work app instead of a game.
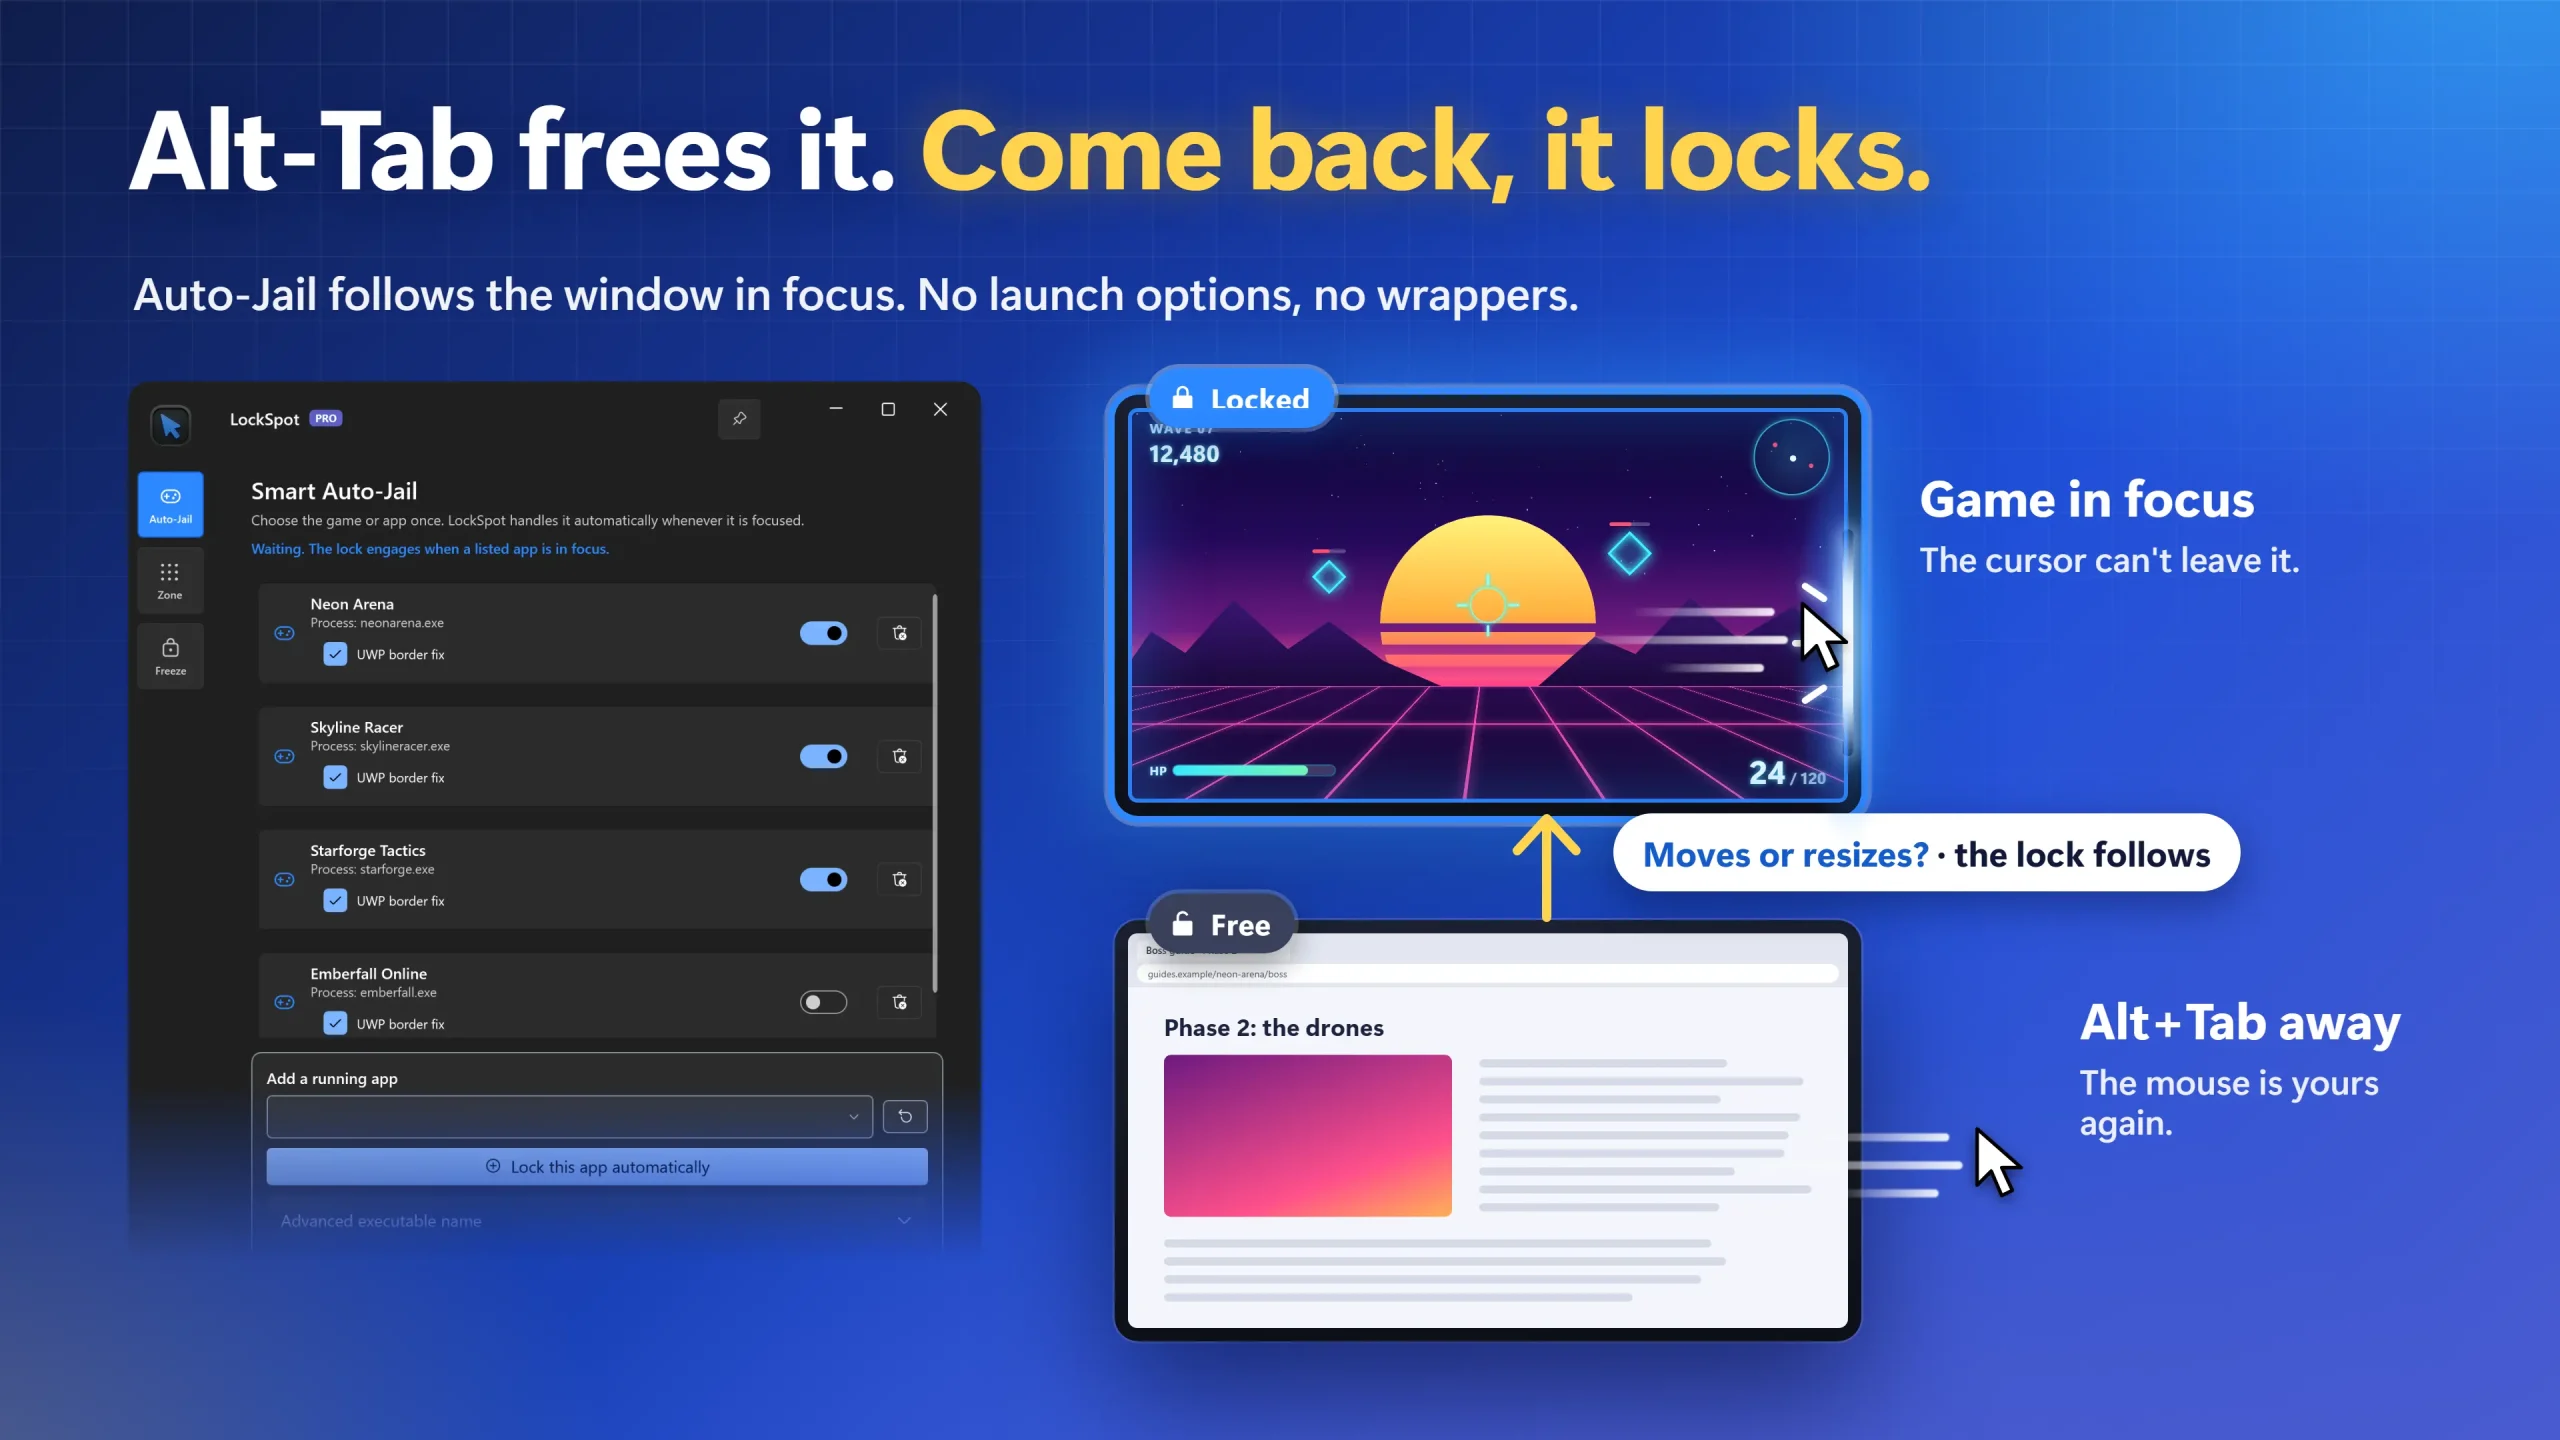
The limit: the fence is the window, and it holds only while that app has focus. To keep the pointer in an area while you click between apps, use a zone.
Way 2: Draw a Zone Anywhere on Your Ultrawide
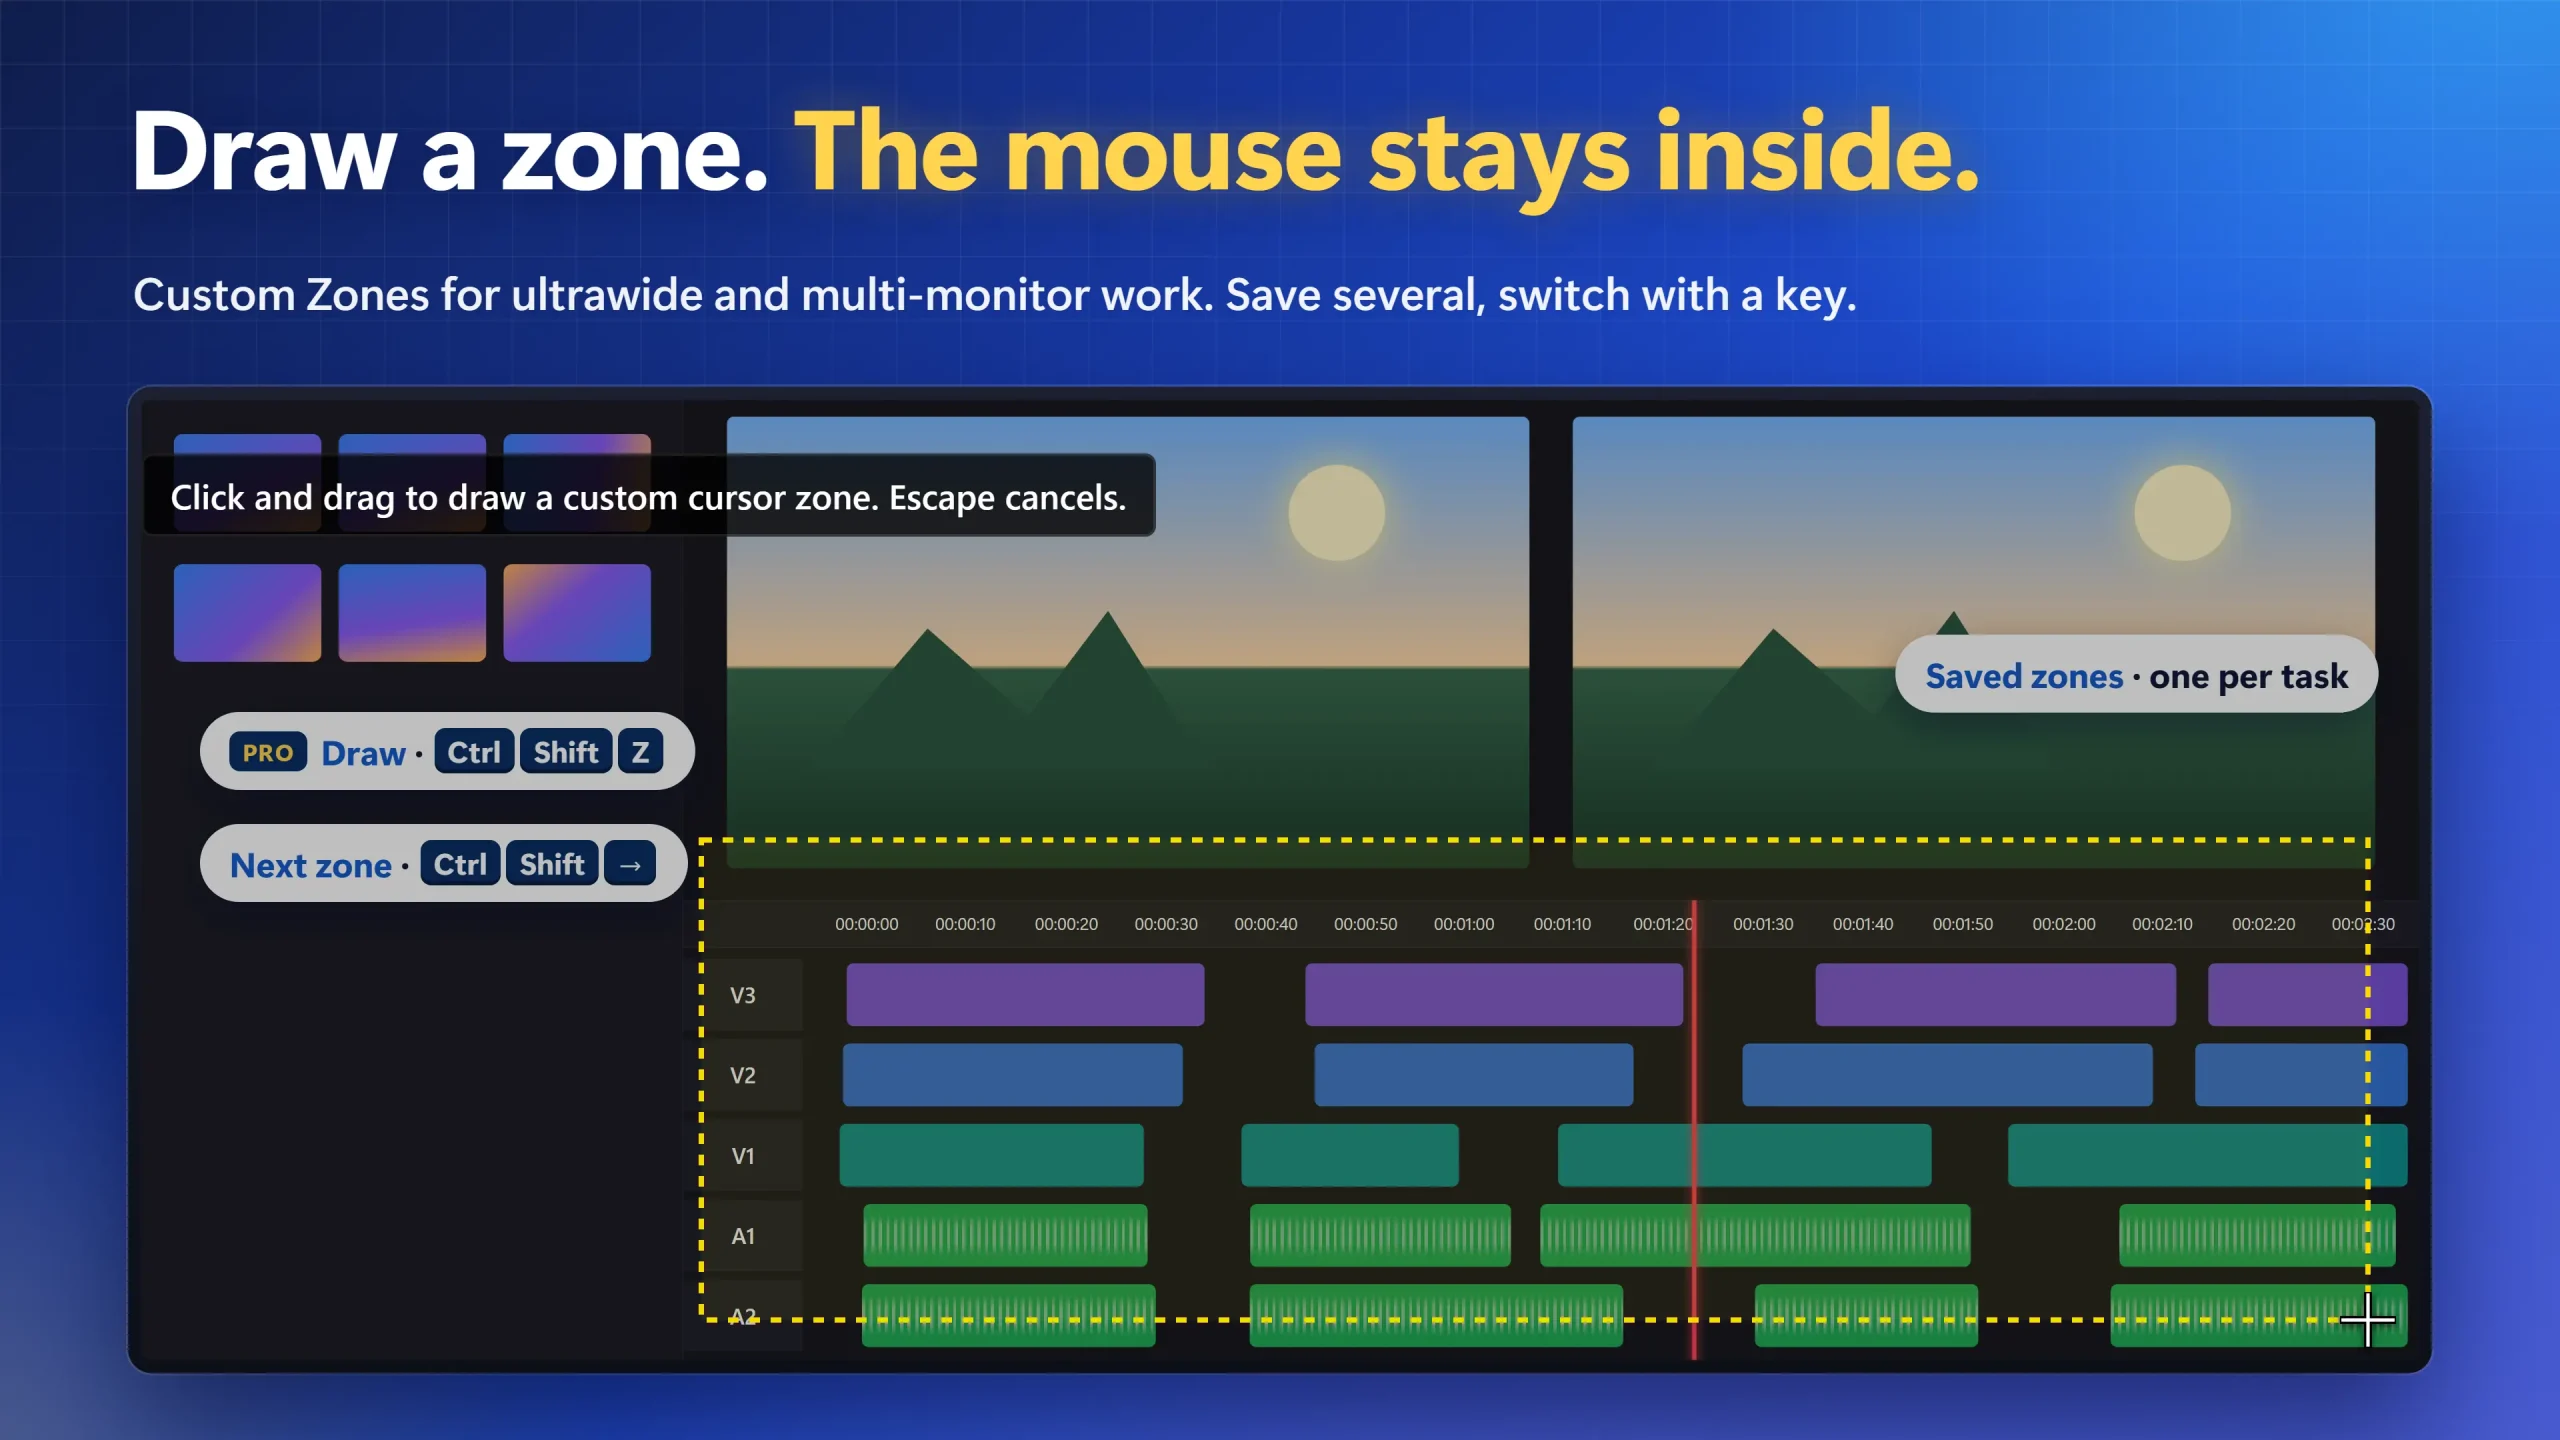
A Custom Zone is a box you draw yourself. The pointer stays inside it whatever app is in front, so you can click between every window inside the box without losing the cursor to the rest of the screen.
- Open LockSpot and make sure the Unlock all hotkey (Ctrl+Shift+U) is on. The free preview needs it as your way out.
- Press Ctrl+Shift+Z and drag a box over the area you want, on the monitor you want.
- Let go. The pointer is now fenced inside the box. Turn on the optional zone guides if you want to see the edges.
- The free preview runs for 2 minutes, once per app launch, so you can test the exact box on your own layout.
- To keep it, upgrade in the app. Saved zones can be moved and resized, and Ctrl+Shift+→ cycles through them, so one key switches between, say, the left two-thirds and the right third of the screen.
One zone covers one monitor. LockSpot keeps each box on the monitor where you draw it. To keep the pointer on a whole screen, draw the box edge to edge over that screen.
Draw a zone and keep the mouse exactly where you work
Install LockSpot free, lock one app to its window, and try a zone for 2 minutes on your own ultrawide.
Free vs Pro: Free for one game, with every hotkey and escape key. Pro is a one-time $3.99 (US) for unlimited games, Custom Zones and Cursor Freeze. Try Zones for 2 minutes and Freeze for 60 seconds in the app before you buy.
How to Get the Mouse Out of a Zone
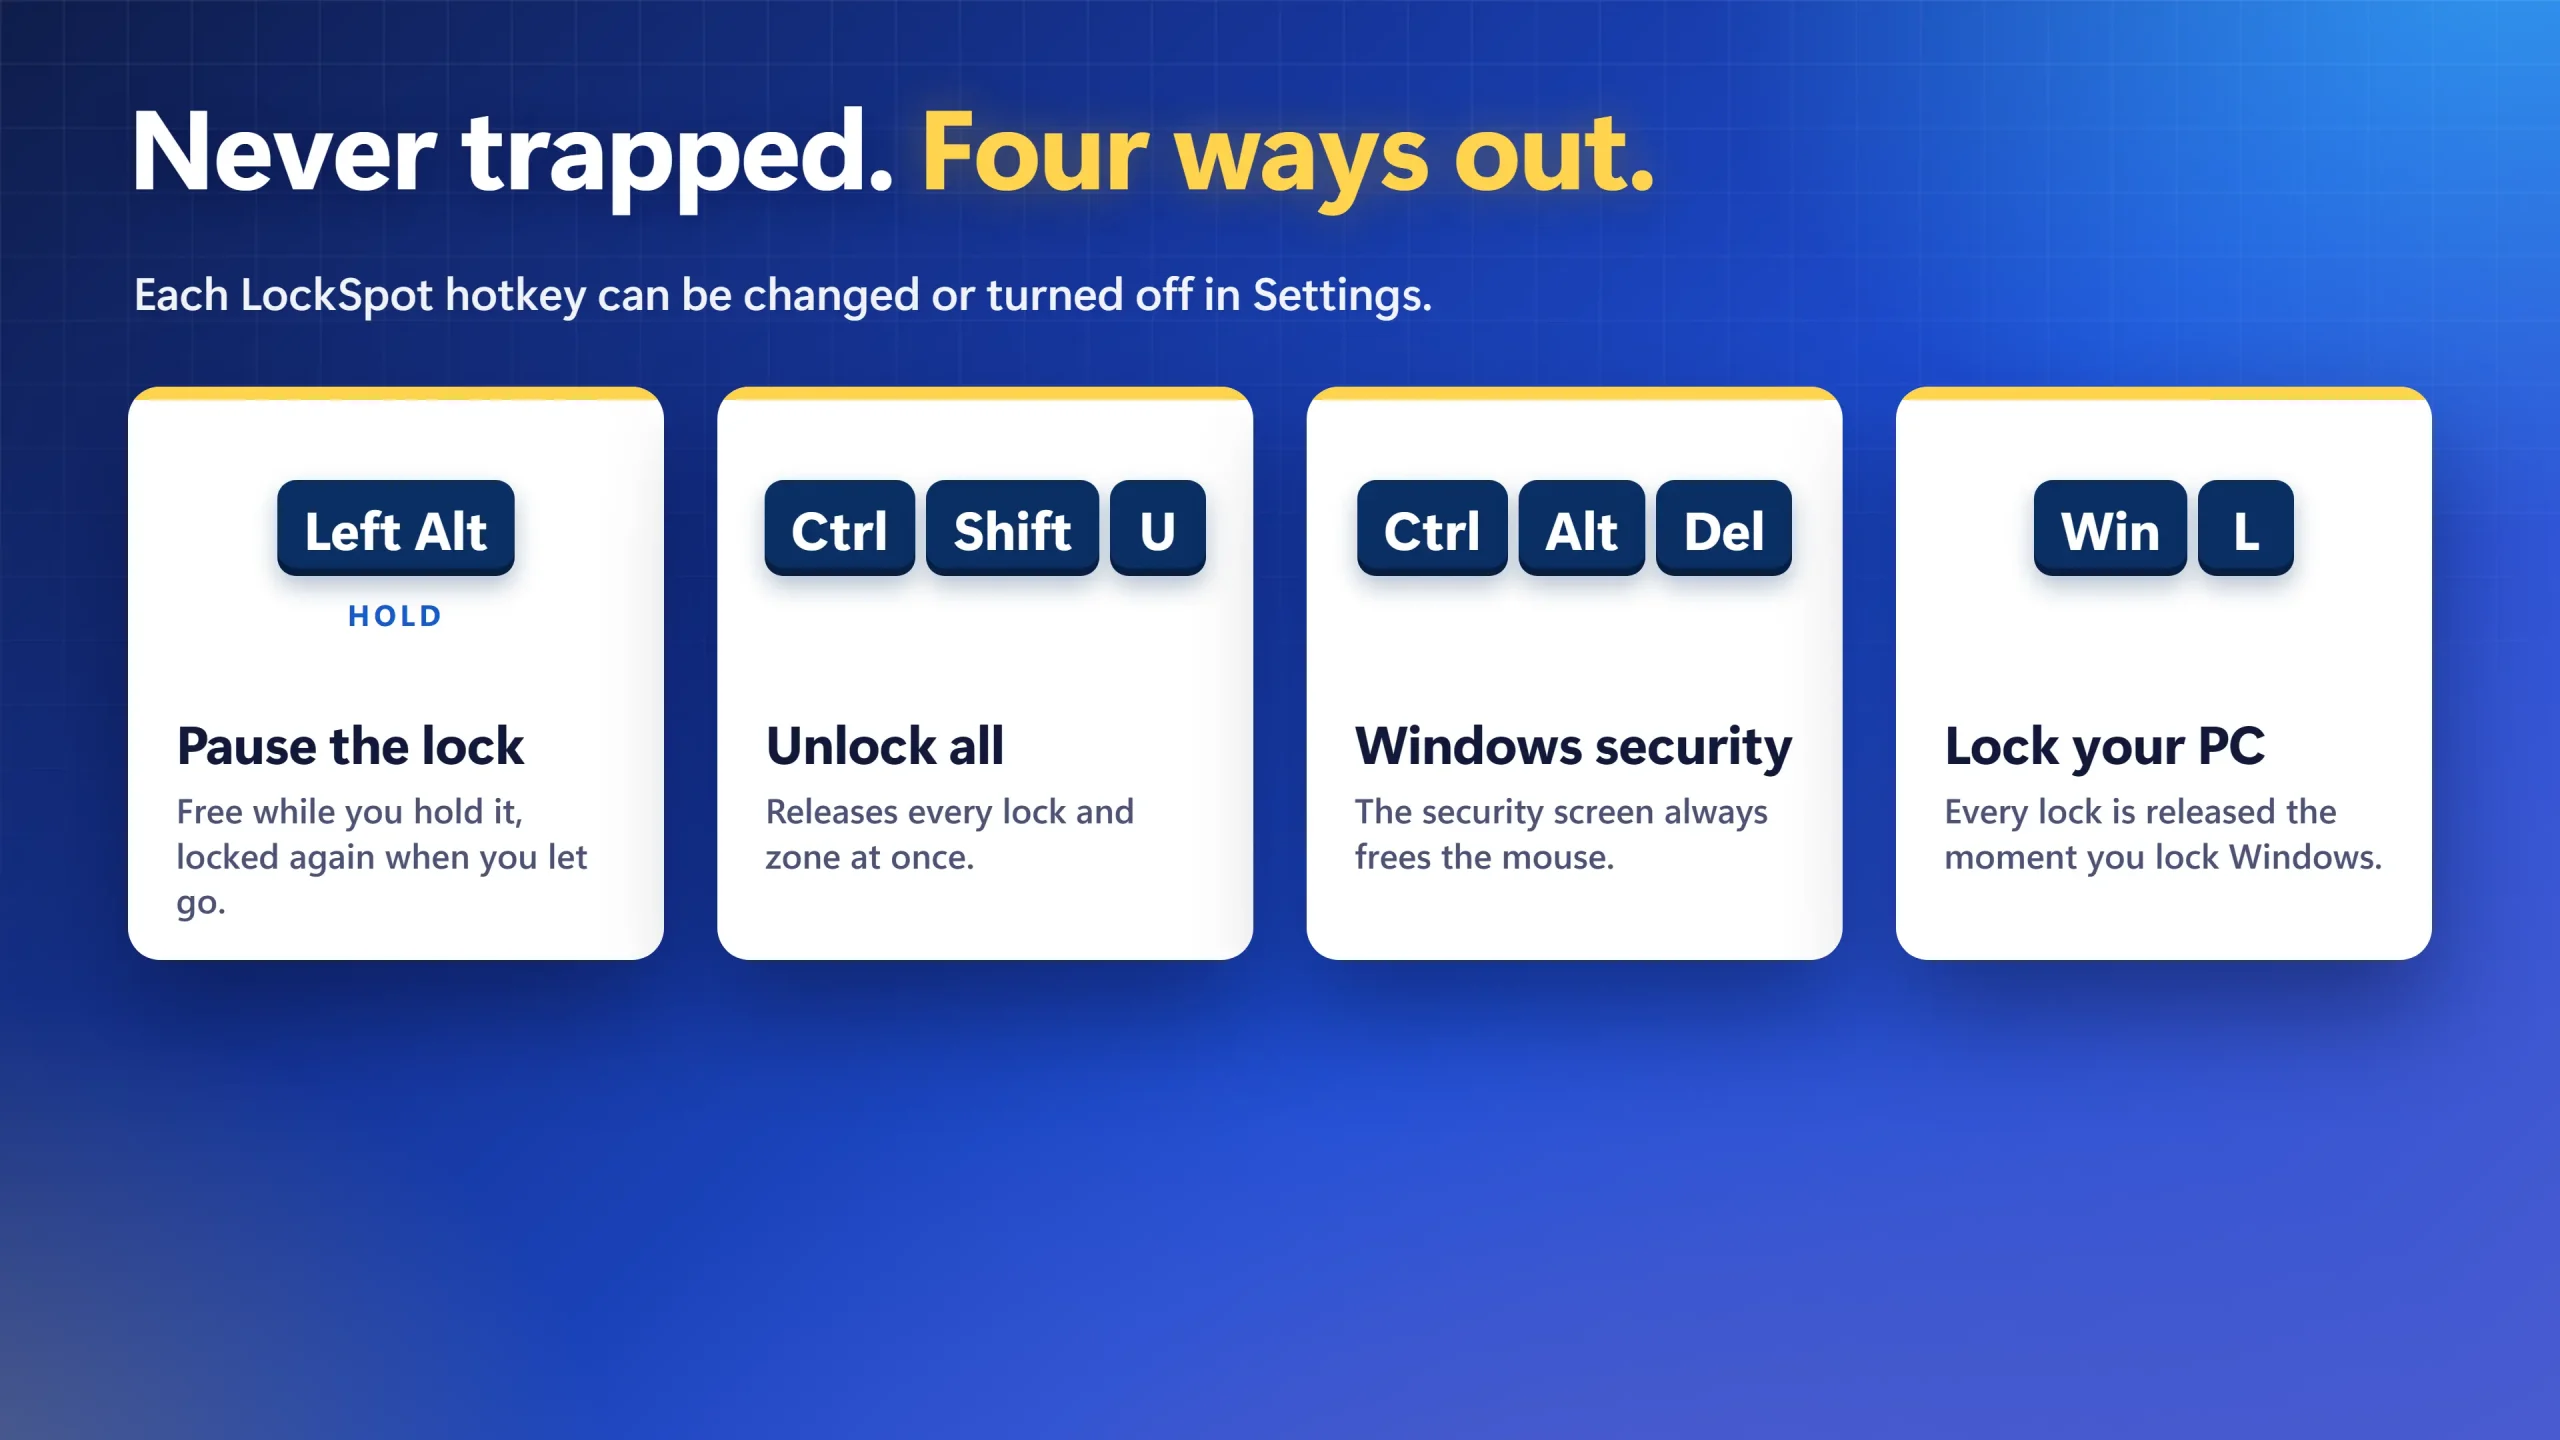
LockSpot has four ways out, and none needs the mouse:
- Hold Left Alt: the lock pauses while you hold it and comes back the moment you let go. You can move this key to Right Alt, Left Shift or Right Ctrl, but it can’t be switched off.
- Ctrl+Shift+U: releases every lock and zone at once.
- Win+L: locking your PC releases every lock.
- Ctrl+Alt+Del: the Windows security screen always frees the mouse.
Way 3: Lock Cursor Tools (Free, Can Span Monitors)
Lock Cursor Tools by Digola is freeware (version 10.1 on its official page) for Windows XP through Windows 11. It restricts the pointer to an area you mark with the mouse, to the primary or secondary monitor, or to part of a chosen app’s window. You turn the lock on and off with a keyboard shortcut (Ctrl+Alt+F12 in gHacks’ review) or by clicking its taskbar icon.
- Pros: free to keep; the area can span several monitors, which LockSpot zones can’t; runs on old Windows versions.
- Cons: a manual toggle, so it doesn’t follow which app is in front; downloaded as an installer from the developer’s site rather than the Microsoft Store; its official page doesn’t mention saving several areas.
Which Way Should You Choose?
- The area is one app: Way 1. Snap it and Auto-Jail it, free.
- The area is part of an ultrawide and you click between apps inside it: Way 2, a Custom Zone. Try it for 2 minutes first.
- The area crosses two monitors, or you want a drawn area free: Lock Cursor Tools.
- You only need whole monitors: Dual Monitor Tools (free, open source, version 2.13) locks the cursor to the screen it is on with a hotkey, or makes the edges “sticky”. It has no custom rectangle.
For a side-by-side of every app that locks the pointer to a game, a window, a monitor or a zone, see our comparison of the best cursor lock apps for Windows, or the full LockSpot feature overview.
When LockSpot Is Not the Right Fit
- You need one zone across two monitors: use Lock Cursor Tools.
- You want a drawn zone free for good. LockSpot’s free tier covers one app’s window.
- Your PC runs Windows 7 or 8. LockSpot needs Windows 10 (version 2004) or Windows 11.
- The app you work in runs as administrator. LockSpot then has to run as administrator too, or Windows won’t let it hold the pointer there.
Frequently Asked Questions
Can Windows 11 limit the mouse to part of the screen without an app?
No. Snap layouts and PowerToys FancyZones place windows into areas, but the pointer still crosses every edge. Only a program that clips the cursor (the Windows ClipCursor API), such as LockSpot or Lock Cursor Tools, can hold it inside a rectangle.
Can a LockSpot zone cover two monitors?
No. Each LockSpot zone stays on the monitor where you draw it, and you can draw a box over a whole screen. If you need one area across two monitors, Lock Cursor Tools (free) can do it.
Does the zone stay on when I click another app?
Yes. A Custom Zone holds the pointer whatever app is in front. Auto-Jail is different: it frees the pointer when you Alt-Tab away from the locked app and locks it again when you come back.
Is LockSpot free?
Yes. Free for one game, with every hotkey and escape key. Pro is a one-time $3.99 (US) for unlimited games, Custom Zones and Cursor Freeze. Try Zones for 2 minutes and Freeze for 60 seconds in the app before you buy. Get it from LockSpot on the Microsoft Store.
None of these worked — what now?
Check three things. If the app runs as administrator, run LockSpot as administrator too. If the zone preview won’t start, turn the Unlock all hotkey (Ctrl+Shift+U) back on, and remember the preview runs once per LockSpot launch. If the area is a game, LockSpot leaves alone any smaller clip the game sets itself; see why the cursor is not locking to a game on Windows 11.
Keep your mouse in the part of the screen you’re working in
Snap one app and lock the cursor to it free, or draw a zone anywhere on your ultrawide and try it for 2 minutes.
Sources consulted: Microsoft Win32 ClipCursor documentation; Microsoft Support: Snap your windows; Microsoft Learn: PowerToys FancyZones; Digola: Lock Cursor Tools; Dual Monitor Tools: Cursor.
About the author: Mashyo is the founder of Creator Kit, the developer of LockSpot. This guide puts the free options before the paid zone feature and names a free competitor where it fits better.
Last reviewed: